Pocket for small and large items.
The pocket square is a practical helper when cleaning, collecting and sorting various things. It can be used in a children's room, in households, but also, for example, in dressing rooms or shops and workshops. With the help of simple instructions, you can easily sew your own pocket square and put your sewing skills to good use.
Designs for decorating a pocket square
Leftover fabrics often accumulate after sewing a project and we don't know what to do with them. That's why we bring suggestions on how to use leftover fabrics and decorate a pocket square in an original way.
Traditional Moravian style:
For this style, it is suitable to choose fabrics with traditional Moravian motifs. We can use, for example, lace, patches with folk motifs, or small artificial flowers and plants. These accessories should be chosen in soft colors and shades so that they are not too prominent and do not deviate too much from the traditional style.
Modern minimalist style:
For a minimalist style, it is good to use simple accessories that give the pocket square a delicate and decent look. For example, we can use patches or small metal buttons in the same color as the pocket square, or complement the pocket square with a fabric with a monochromatic motif.
Classic retro style:
For a retro style, it is good to use patches, inscriptions or applications with retro motifs, for example small vintage cars or small motifs from the 50s and 60s. We can also use metal buttons and patches with a retro motif.
Romantic style:
For a romantic style, lace, ribbons, pearls and beads are suitable. These accessories should be in soft colors and soft shades to perfectly match the romantic style. We can also use flower applications, artificial flowers or flower brooches.
In addition to the above styles, of course, other accessories can be used, such as decorative zippers, small artificial flowers, flower brooch, flower appliqué, decorative buttons, pearls and beads, and more. However, it is important not to forget about the functionality of the pocket and that the things it is meant to be used for can be conveniently and practically stored in it.
Let's prepare for the pocketbook:
- a 0.9 m long branch that can be painted in a suitable color, or a wooden broom handle
- 0.9 m of fabric No. 3005/52 , or any other cotton fabric
- 0.3 m plain cotton fabric, e.g.: cotton canvas , or cotton with a nice pattern
- 0.4 m of any fabric for the pockets, we recommend denim
- 2 pieces of suitable thread and it doesn't have to be in the same color, the stitching will at least look effective.
- decorative patches
- sticky cravings
- threads
- sewing machine
- scissors
- pins
- textile pencil

Method:
-
We iron the fabrics thoroughly before cutting, or wash them beforehand
-
Draw the necessary parts on the fabric and cut them out (pocket, pockets, loops for hanging the pocket on a prepared branch or pole)
-
We glue the pocket and the loops with adhesive so that they hold the chosen shape better
- Cut a strip of plain cotton fabric measuring 8x30 cm
- Fold both edges of the strip about 1 cm inward and iron
- Fold the strip in half and iron again
- Along the entire length of both sides of the strip, stitch about 1 mm from the edge
- Cut the strip into 5 smaller pieces measuring 8x6 cm. These pieces are then used as loops to hang the bagger on a branch or pole
-
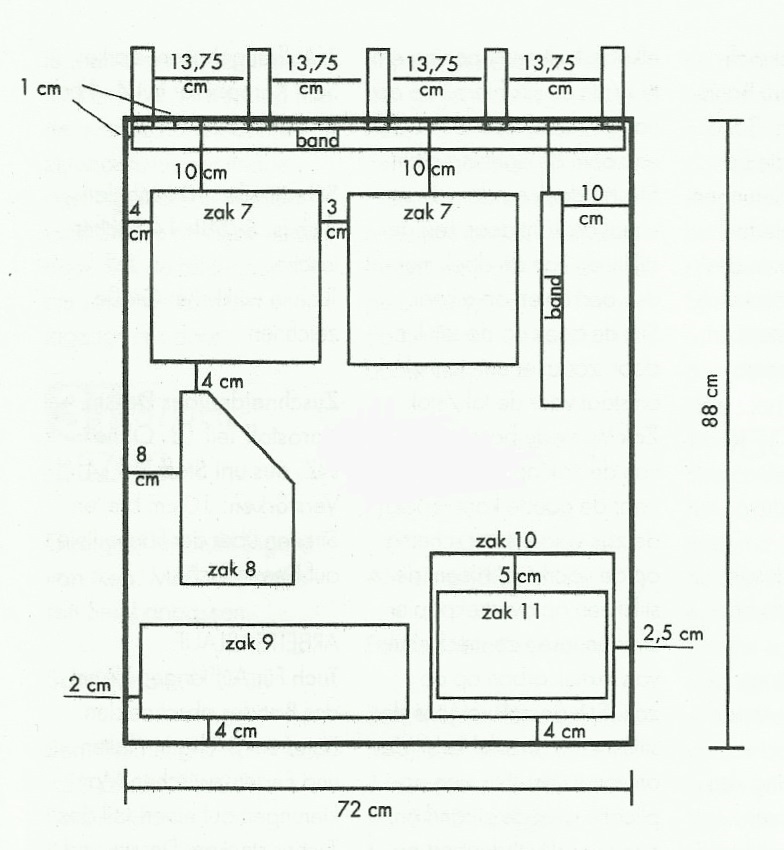
In the next step, we will sew the pocket itself. From the obverse side, mark the location of the loops . In our cut, they are 13.75 cm apart. We pin the prepared loops to the edge of the pocket square, or we can sew them on. Place the two parts of the pocket square together face to face and sew from the reverse side all the way around for 0.5 cm. On one side, we leave an opening of about 10 cm to turn the pocket square to the cheek . After stitching, cut off the excess fabric in the corners .
-
We turn the pocket square through the prepared opening to the cheek and prepare the edge of the pocket square. We can either fasten the opening we used to turn the pocket square or pin it to the edge. Iron the pocket square and stitch it all around in any width.
-
We arrange the pockets on the sewn pocket square as you like, or you can be inspired by our cut . Pockets can be cut, for example, from denim . These pockets will look good even if they are not cleaned. After placing the pocket, sew 0.5 cm from three sides. If you want to decorate your pockets with e.g. patches, sew these items onto the pockets before the pockets themselves onto the pocket square.
-
Iron the entire pocket square and hang it on the prepared rod in the desired place.
Now we can use our new pockets to store various things, such as tools, small toys, crayons or cosmetics.

source: stitched you
This online store stores cookies that help it function properly. By using our services, you agree to their use.